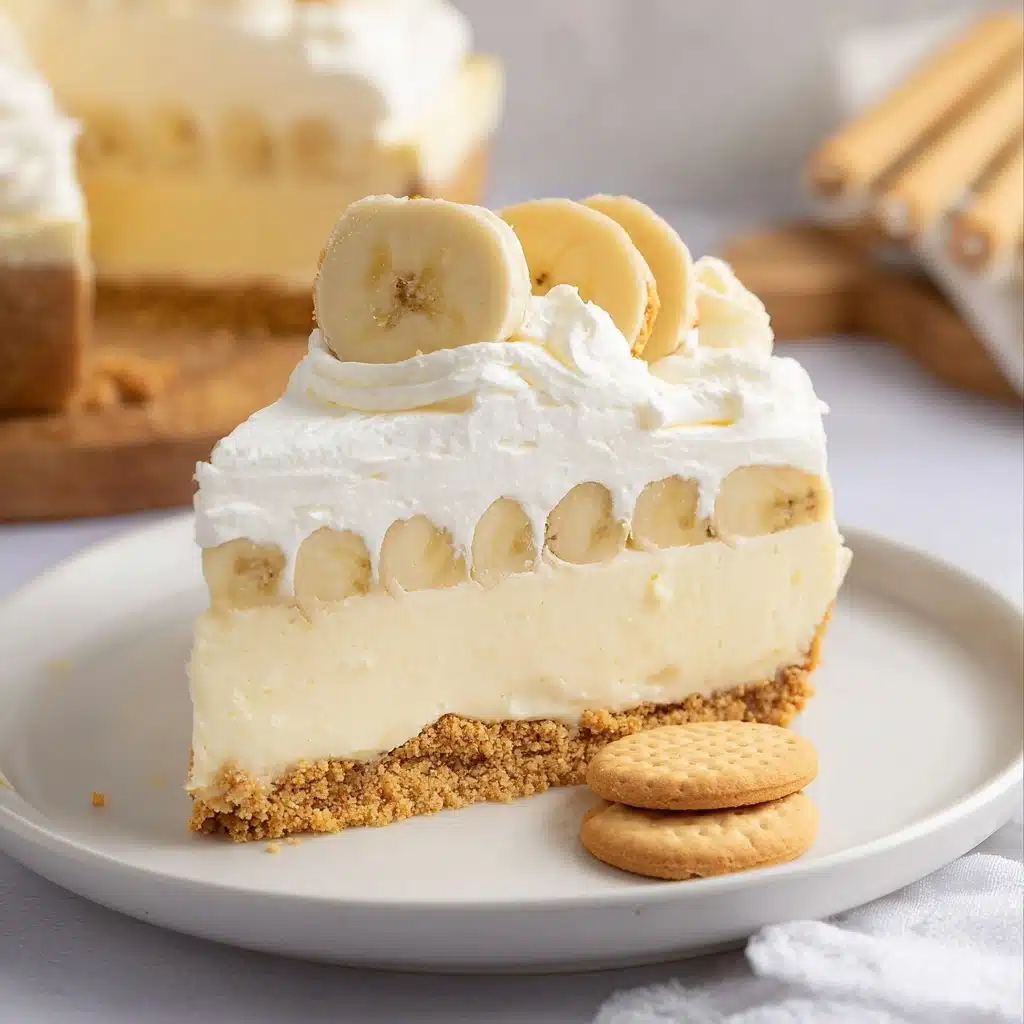
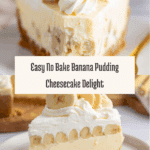
No Bake Banana Pudding Cheesecake Recipe
The No Bake Banana Pudding Cheesecake is an absolute dream for anyone who can’t resist the creamy nostalgia of classic banana pudding, yet craves the tang and decadence of cheesecake. This dessert marries layers of lush banana pudding, crisp vanilla wafers, and a whipped cream cheese filling, all stacked together into a stunning, sliceable treat that’s perfect for any celebration or lazy weekend afternoon. Imagine the creamy, dreamy texture mingled with bursts of fresh banana and that buttery, crunchy crust—pure happiness in every bite! Best of all, there’s no oven needed, so it’s as easy as it is irresistible.
Ingredients You’ll Need

Ingredients You’ll Need
This No Bake Banana Pudding Cheesecake recipe uses simple, supermarket staples that all play a crucial role: from the rich tang of cream cheese to the pillowy finish of whipped cream, and, of course, those classic vanilla wafers that everyone adores. Each ingredient adds flavor, structure, or a burst of fresh banana brightness, making every layer completely essential to the finished dessert.
- Vanilla Wafers (2 cups, finely crushed): The nostalgic and sweet crunch forms the base, perfectly echoing the classic banana pudding vibe.
- Melted Unsalted Butter (6 tablespoons): This binds all those wafer crumbs into a solid, sliceable crust with a rich finish.
- Granulated Sugar (2 tablespoons): Adds just the right touch of sweetness to heighten the flavor without overpowering.
- Cream Cheese (3, 8-ounce packages, softened): The key to that lush, tangy, and creamy cheesecake layer—full-fat and properly softened works wonders here.
- Sweetened Condensed Milk (1, 14-ounce can): Adds sweetness and densifies the filling, making it silky smooth without baking.
- Heavy Whipping Cream (1 cup, cold): Whipped until fluffy, this ingredient brings lightness and makes every bite literally melt in your mouth.
- Instant Banana Pudding Mix (1, 3.4-ounce package): Brings in that signature banana flavor, as well as a gorgeous yellow hue and extra creaminess.
- Vanilla Extract (1 teaspoon): Boosts the sweetness and rounds out all the layers with warmth and depth.
- Fresh Lemon Juice (1 tablespoon): Brightens and balances the sweetness, lifting up the whole cheesecake without overpowering.
- Ripe Bananas (3–4 medium, sliced): Choose ripe but firm bananas for extra flavor and structure—too soft and they’ll get mushy.
- Additional Vanilla Wafers: For layering and decorating, adding classic texture and irresistible curb appeal.
- Whipped Cream or Cool Whip (for topping, optional): For that fluffy, cloud-like cap everyone loves on banana pudding desserts.
- Vanilla Wafer Crumbs (for garnish, optional): Adds a crunchy finish and pretty presentation to the top of your showstopper.
How to Make No Bake Banana Pudding Cheesecake
Step 1: Prepare the Vanilla Wafer Crust
Start by crushing your vanilla wafers—you can pulse them in a food processor or pop them in a zip-top bag and take out your stress with a rolling pin. Mix the crumbs with melted butter and sugar, then stir well until everything resembles wet sand. This mixture becomes the buttery, unforgettable base of your No Bake Banana Pudding Cheesecake.
Step 2: Press the Crust into the Pan
Transfer the crumb mixture to a 9-inch springform pan lined with parchment for easy serving later. Press firmly and evenly using the bottom of a measuring cup or glass. Chilling the crust for a bit in the fridge is essential—it sets everything so you get glorious, tidy slices later on.
Step 3: Make the Cheesecake Filling
In a large bowl, beat the softened cream cheese until it’s luxurious and lump-free. Slowly stream in the sweetened condensed milk, continuing to beat. The result should be ultra-smooth and creamy, so scrape down those bowl sides for even mixing.
Step 4: Whip the Heavy Cream
Pour the cold heavy cream into a clean, chilled bowl, and whip until stiff peaks magically appear. Be patient and don’t overwhip—you want sturdy, fluffy peaks that hold their shape when you lift the whisk.
Step 5: Combine Filling Ingredients
Gently fold the whipped cream into the cream cheese mixture in two additions to keep things airy. Add in the banana pudding mix, vanilla extract, and lemon juice, folding slowly until everything is just combined and the color is uniform. Overmixing here is the enemy of pillowy cheesecake, so keep it gentle!
Step 6: Assemble the Banana Pudding Cheesecake
Retrieve your chilled crust. First, scatter a layer of sliced bananas on the bottom, followed by a layer of vanilla wafers. Spread half of your cheesecake filling evenly over these layers. Repeat the banana and wafer layering, then finish off with the remaining luscious cheesecake filling. Smooth the top for that photo-worthy finish.
Step 7: Chill the Cheesecake
Cover tightly with plastic wrap and transfer to the refrigerator. Let it chill for at least 6 hours, or, ideally, overnight—this is when all the layers set and meld, creating that perfect sliceable texture that defines No Bake Banana Pudding Cheesecake.
Step 8: Garnish and Serve
Once fully chilled, release the cheesecake from the pan. Deck out the top with mounds of whipped cream, a sprinkle of vanilla wafer crumbs, and more fresh banana slices. Every garnish adds another layer of flavor, crunch, and pure happiness to the dessert. Slice and serve chilled!
How to Serve No Bake Banana Pudding Cheesecake
Garnishes
For a true showstopper, pipe or dollop clouds of whipped cream around the edges, add extra banana slices, and finish with a scattering of vanilla wafer crumbs. Not only do these garnishes complement the flavors inside, but they make the No Bake Banana Pudding Cheesecake look absolutely irresistible and ready for any celebration. The extra textures and pops of color bring every slice to life!
Side Dishes
This dessert shines brightest on its own but pairs beautifully with lighter sides like fresh berries, a fruit salad, or tiny shortbread cookies. If you’re serving this at a party or gathering, a platter of assorted cookies or a sparkling lemonade can help cut through the richness and provide a refreshing contrast to each creamy forkful.
Creative Ways to Present
For the ultimate fun twist, you can portion the No Bake Banana Pudding Cheesecake into mini mason jars or clear cups for individual servings—perfect for parties and picnics! Alternatively, layer it trifle-style in a large glass bowl to show off every gorgeous layer. For a whimsical touch, top with mini wafers or edible flowers—there’s no limit to how playfully you can present this classic reimagined dessert.
Make Ahead and Storage
Storing Leftovers
Leftover No Bake Banana Pudding Cheesecake should be kept covered in the refrigerator. Place plastic wrap lightly directly over the surface or use an airtight container; it’ll stay delightfully fresh for up to four days. While the bananas may darken slightly, the flavor remains spot-on—just add a fresh garnish right before serving.
Freezing
If you want to plan even further ahead, this cheesecake freezes surprisingly well. Once it’s fully set, wrap it tightly in plastic wrap and foil, or use an airtight freezer-safe container. Thaw overnight in the fridge before serving. For best results, garnish just before serving (bananas and whipped cream don’t love the freezer!).
Reheating
No baking means no reheating! Simply slice and let the cheesecake come to room temperature for about ten minutes if you want a slightly softer texture. Otherwise, serve it straight from the fridge for that perfect cold and creamy bite.
FAQs
Can I make No Bake Banana Pudding Cheesecake a day in advance?
Absolutely! In fact, the flavor and texture improve with time. Chilling overnight allows all the layers to set beautifully, making it even easier to slice and serve.
What’s the best way to keep bananas from browning?
You can lightly brush the banana slices with a touch of lemon juice before layering them into your No Bake Banana Pudding Cheesecake. This not only prevents browning but adds an extra zesty pop.
Can I use a different pudding flavor?
Definitely! If you want to switch things up, vanilla or even butterscotch instant pudding works well, though it won’t give you that signature banana pudding taste. The texture will remain lovely and creamy.
Is it possible to make a gluten-free version?
Yes, just swap in your favorite gluten-free vanilla wafer cookies for the crust and layers. All the other ingredients are naturally gluten-free, so everyone can enjoy this classic dessert.
What if I don’t have a springform pan?
You can use a deep-dish pie plate or a square baking dish instead. You won’t be able to unmold a perfect round cake, but the flavor and layers will still wow everyone—just serve in squares or scoops!
Final Thoughts
If you adore creamy, dreamy desserts, you owe it to yourself (and your lucky friends or family) to make this No Bake Banana Pudding Cheesecake. Every bite is a summer party, birthday bash, or cozy comfort moment waiting to happen. Treat yourself and watch this become a new crowd favorite!
PrintNo Bake Banana Pudding Cheesecake Recipe

Indulge in the delicious fusion of classic banana pudding and creamy cheesecake with this no-bake dessert. Layers of vanilla wafer crust, luscious banana cheesecake filling, and fresh banana slices make this a perfect treat for any occasion.
- Prep Time: 30 minutes
- Total Time: 6 hours 30 minutes
- Yield: 1 9-inch cheesecake
- Category: Dessert
- Method: No-Bake
- Cuisine: American
- Diet: Vegetarian
Ingredients
For the Crust:
- Vanilla Wafers: 2 cups, finely crushed
- Melted Unsalted Butter: 6 tablespoons
- Granulated Sugar: 2 tablespoons
For the Cheesecake Filling:
- Cream Cheese: 3 (8-ounce) packages, softened
- Sweetened Condensed Milk: 1 (14-ounce) can
- Heavy Whipping Cream: 1 cup, cold
- Instant Banana Pudding Mix: 1 (3.4-ounce) package
- Vanilla Extract: 1 teaspoon
- Fresh Lemon Juice: 1 tablespoon
For the Banana Pudding Layer & Topping:
- Ripe Bananas: 3-4 medium, sliced
- Vanilla Wafers: Additional, for layering and garnish
- Whipped Cream or Cool Whip: For topping (optional)
- Sprinkling of Vanilla Wafer Crumbs: For garnish (optional)
Instructions
- Prepare the Vanilla Wafer Crust: In a food processor, pulse the vanilla wafers until finely crushed. Mix with melted butter and sugar, press into pan.
- Press the Crust into the Pan: Firmly press the crust into a springform pan and chill.
- Make the Cheesecake Filling: Beat cream cheese, add condensed milk, then fold in whipped cream and other filling ingredients.
- Whip the Heavy Cream: Beat cold heavy cream until stiff peaks form.
- Combine Filling Ingredients: Gently fold whipped cream into cream cheese mixture, add pudding mix, vanilla, and lemon juice.
- Assemble the Banana Pudding Cheesecake: Layer bananas, wafers, and filling in the prepared crust.
- Chill the Cheesecake: Refrigerate for at least 6 hours or overnight to set.
- Garnish and Serve: Decorate with toppings of choice, slice, and enjoy chilled.
Notes
- To prevent bananas from browning, toss them in a little lemon juice before layering.
- For a stronger banana flavor, consider adding a layer of banana slices within the filling as well.
Nutrition
- Serving Size: 1 slice
- Calories: 380
- Sugar: 28g
- Sodium: 240mg
- Fat: 24g
- Saturated Fat: 14g
- Unsaturated Fat: 8g
- Trans Fat: 0g
- Carbohydrates: 36g
- Fiber: 1g
- Protein: 5g
- Cholesterol: 80mg
Keywords: No-Bake, Banana Pudding, Cheesecake, Dessert, Easy, Creamy

