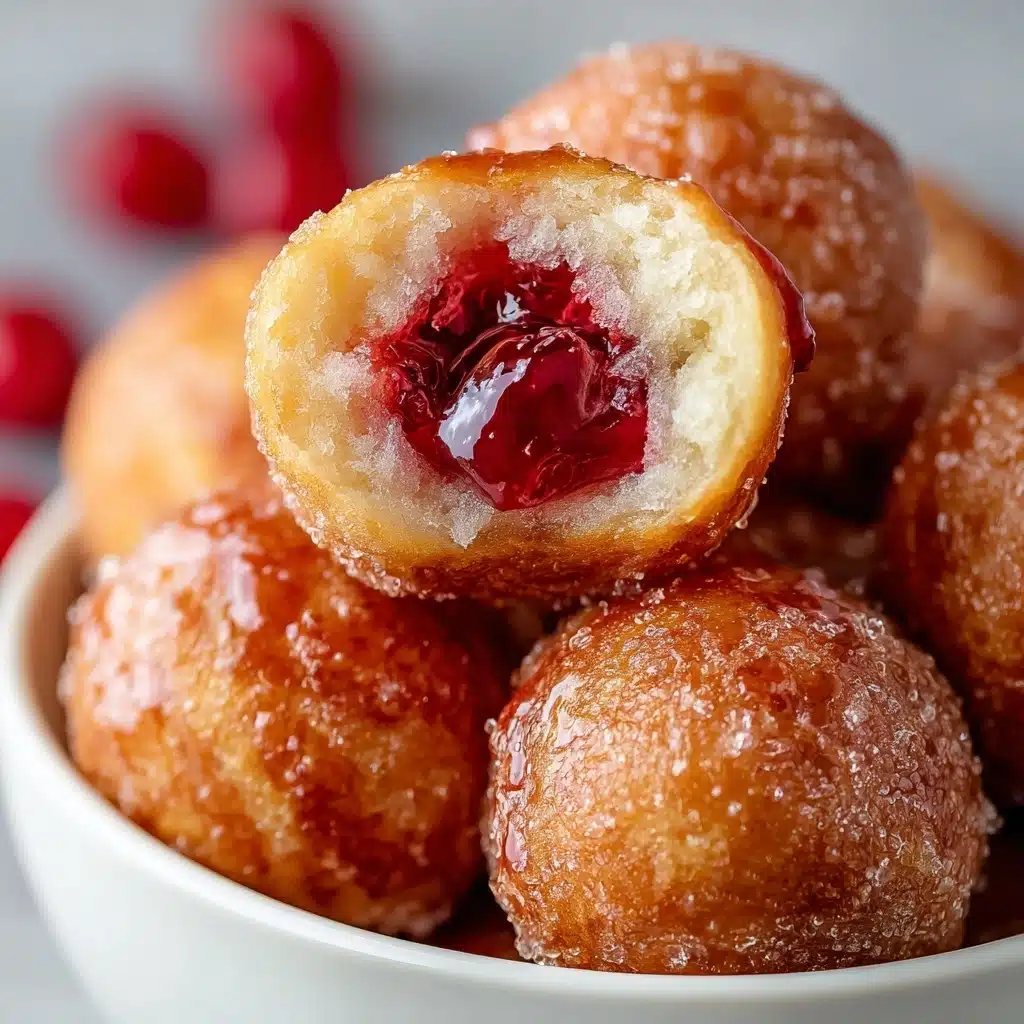
Cherry Pie Bites Recipe
If there’s ever a way to bring the magic of homemade cherry pie to your table in less than 30 minutes, it’s with these delightful Cherry Pie Bites. They’re the ultimate treat, combining juicy cherries, golden pastry, and sweet vanilla glaze, but with none of the fuss of traditional pie-making. Whether you’re hosting brunch, a casual get-together, or just need a sweet pick-me-up, Cherry Pie Bites are bite-sized wonders that deliver big on flavor with practically zero stress in the kitchen.
Ingredients You’ll Need
This recipe is all about celebrating convenience without sacrificing flavor. Each ingredient is chosen for how effortlessly it turns simple staples into something special—you may even have most of them on hand already!
- Cherry pie filling (1 21 oz can): Packed with tart, juicy cherries in a thick syrup, this shortcut captures the essence of homemade pie filling without hours of prep.
- Crescent roll dough (2 8 oz tubes): The secret to that flaky, golden crust—these make building individual pie cups a breeze.
- Powdered sugar (1 cup): For that classic pie-shop glaze, this delicate sugar blends seamlessly into a smooth drizzle.
- Milk (1-2 tablespoons): This brings your glaze together and lets you control just how thick or thin you want it for perfect drizzling.
- Nonstick cooking spray: A simple spritz ensures your Cherry Pie Bites release easily from the muffin tin, so nothing sticks and cleanup is a cinch.
How to Make Cherry Pie Bites
Step 1: Preheat Your Oven
Begin by heating your oven to 375°F (190°C). Taking a minute to preheat is crucial—it ensures your Cherry Pie Bites cook evenly and get that perfect golden top. While the oven’s coming up to temperature, go ahead and prepare your muffin tin with a light coat of nonstick spray. This is your insurance policy against any sticking, so those cute little pies come out looking as good as they taste.
Step 2: Prepare the Crescent Roll Dough
Carefully unroll both tubes of crescent roll dough. You’ll notice they’re naturally perforated into triangles. Gently separate each triangle and press them into the muffin tin wells, making sure the widest part of the dough sits at the bottom. Use your fingers to nudge the dough up the sides, creating little cups for your cherry filling. Don’t worry if it isn’t perfect—rustic charm is totally encouraged here!
Step 3: Add the Cherry Pie Filling
This is where the magic happens. Spoon about 3 to 4 generous tablespoons of cherry pie filling into each dough-lined cup. The filling should come up most of the way, and it’s absolutely fine if a few cherries escape or if the mixture overflows a bit during baking—it’ll just caramelize at the edges for extra flavor.
Step 4: Fold and Tuck
Take the narrow tips of the crescent dough triangles and gently fold them over the cherry filling, pressing down just enough to help them stick. The little pies don’t need to be fully sealed—the open, slightly imperfect tops let the beautiful red cherries peek through.
Step 5: Bake Until Golden
Pop the muffin tin into your preheated oven and bake for 13-14 minutes. You’re aiming for a golden brown crust—keep an eye out at the 12-minute mark since oven temperatures can vary. As they bake, the smell of bubbling cherries and toasty pastry will fill your kitchen (and probably attract some curious snackers).
Step 6: Make the Glaze
While the Cherry Pie Bites are baking, mix up your glaze. In a small bowl, whisk together the powdered sugar with 1 tablespoon of milk. If you want a thinner drizzle, add a little more milk, a few drops at a time, until you reach your desired consistency. The glaze should be smooth enough to run off a spoon, but not so thin that it disappears.
Step 7: Glaze and Serve
Once your pie bites are out of the oven and still slightly warm, generously drizzle the glaze over each one. The heat will help everything melt together beautifully. Let them stand for a few minutes to set, if you can resist digging in right away!
How to Serve Cherry Pie Bites

Garnishes
Dress up your Cherry Pie Bites with a flourish of garnishes to make them even more irresistible. A light dusting of extra powdered sugar or a dollop of whipped cream gives them a classic, bakery-style look. For a pop of color, sprinkle on a few fresh mint leaves or zest a bit of lemon over the top—the tartness pairs wonderfully with cherries.
Side Dishes
While Cherry Pie Bites can absolutely stand on their own, they play beautifully with sides like vanilla ice cream, a handful of fresh berries, or even a cup of rich, dark coffee. Thinking of serving them at brunch? Pair with a crisp mimosa or a creamy latte, and you’ve got a spread that everyone will rave about.
Creative Ways to Present
Get playful with presentation! Arrange Cherry Pie Bites in a rustic basket lined with a pretty cloth napkin or serve them on a cake stand for a touch of elegance at parties. For a festive touch at the holidays, drizzle a little white chocolate over the top or tuck a cherry stem into each for cute, hand-held treats. They even look charming boxed up as thoughtful gifts!
Make Ahead and Storage
Storing Leftovers
If you end up with a few Cherry Pie Bites left (which is rare!), store them in an airtight container at room temperature for up to two days. After that, it’s best to move them to the fridge, where they’ll keep for another day or two. Just know the crust may soften slightly, but a quick trip to the oven can revive them.
Freezing
Yes, you can freeze Cherry Pie Bites! Let the bites cool completely, then arrange them in a single layer on a baking sheet and freeze until solid. Transfer them to a zip-top freezer bag or container, where they’ll keep for up to two months. Thaw overnight in the refrigerator before reheating or serving.
Reheating
To enjoy that just-baked flavor, pop the bites back in a preheated 300°F oven for 5-7 minutes or until warmed through. If you’re in a rush, a quick 10-second zap in the microwave also works, but the oven will bring back the best texture. You can add a fresh drizzle of glaze after reheating for extra wow factor.
FAQs
Can I use homemade cherry pie filling instead of canned?
Absolutely! If you have a favorite homemade cherry pie filling recipe, it will work beautifully in Cherry Pie Bites. Just be sure the filling isn’t too runny so it stays put in the dough cups while baking.
Is there a substitute for crescent roll dough?
Puff pastry makes a wonderful substitute if you’d like a flakier texture, or you can use biscuit dough for a more hearty, rustic feel. Adjust baking times slightly as needed and keep an eye on the color to avoid overbaking.
How can I keep the filling from bubbling over?
It’s completely normal for a bit of filling to overflow—that’s part of their charm! But if you’d like to keep things tidy, don’t overfill the muffin cups and keep the dough edges folded as much as possible over the top of the filling.
Can I make Cherry Pie Bites gluten-free?
Yes, look for gluten-free crescent roll dough or puff pastry available at most supermarkets. Pair it with a gluten-free cherry pie filling, and don’t forget to check your glaze ingredients to be certain!
Do I need to let the bites cool before glazing?
Letting them cool just a few minutes helps the glaze set nicely and keeps it from running off completely. Drizzling while they’re a little bit warm lets the glaze soak in just enough for a luscious finish.
Final Thoughts
These Cherry Pie Bites are proof that you don’t need hours or a rolling pin to capture the joy of homemade pie. With just a handful of simple ingredients and easy steps, you can whip up a bakery-worthy treat that’s perfect for sharing (or sneaking one more for yourself). Give them a try, and I promise they’ll become a new favorite in your dessert rotation!
PrintCherry Pie Bites Recipe

Indulge in these delightful Cherry Pie Bites that are bite-sized pockets of sweet cherry goodness wrapped in flaky crescent roll dough, drizzled with a simple powdered sugar glaze. Perfect for a quick and easy dessert or snack.
- Prep Time: 15 minutes
- Cook Time: 13-14 minutes
- Total Time: 30 minutes
- Yield: 24 bites 1x
- Category: Dessert
- Method: Baking
- Cuisine: American
- Diet: Vegetarian
Ingredients
Crescent Roll Dough:
- 2 8 oz tubes crescent roll dough
Cherry Pie Filling:
- 1 21 oz can cherry pie filling
Glaze:
- 1 cup powdered sugar
- 1–2 tablespoons milk
Instructions
- Preheat Oven: Set your oven to 375°F (190°C). Lightly grease a standard muffin tin with nonstick cooking spray.
- Prepare Dough: Unroll the crescent roll dough and place each piece into a muffin tin, positioning the widest part at the bottom.
- Add Filling: Spoon cherry pie filling into each dough cup, using about 3 to 4 heaping tablespoons. It’s fine if some filling overflows while baking.
- Fold Dough: Gently fold the dough corners over the filling to enclose it as much as possible.
- Bake: Place in the oven and bake for 13-14 minutes, or until golden brown.
- Make the Glaze: In a small bowl, whisk together the powdered sugar and milk until smooth. Adjust the milk for your preferred glaze consistency.
- Glaze the Bites: Drizzle the glaze over the warm cherry bites using a spoon. Serve and enjoy!
Nutrition
- Serving Size: 1 bite
- Calories: 120
- Sugar: 12g
- Sodium: 120mg
- Fat: 4g
- Saturated Fat: 2g
- Unsaturated Fat: 2g
- Trans Fat: 0g
- Carbohydrates: 20g
- Fiber: 1g
- Protein: 1g
- Cholesterol: 0mg
Keywords: Cherry Pie Bites, Mini Cherry Pies, Crescent Roll Cherry Bites
