Red Velvet Cheesecake Bites Recipe
Introduction
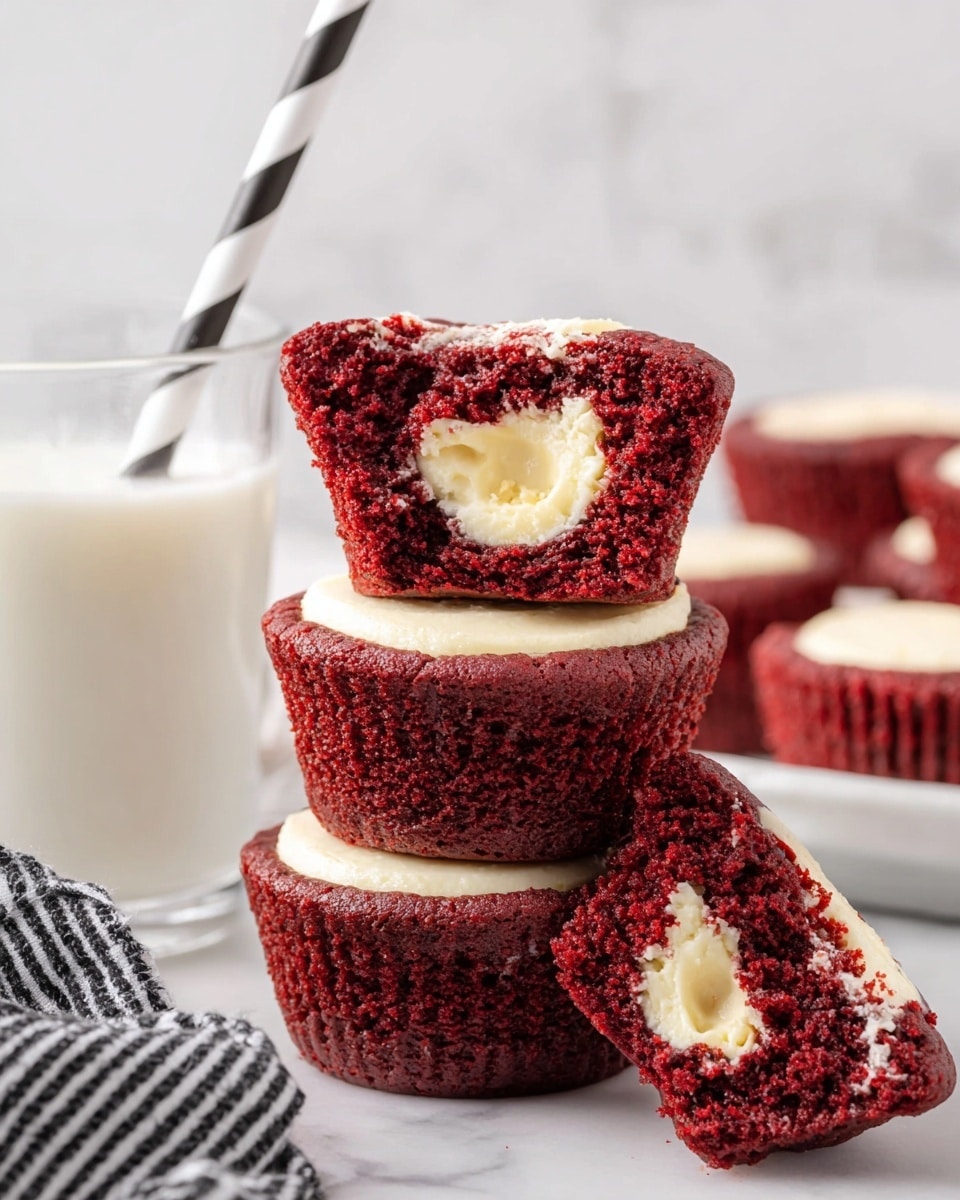
These Red Velvet Cheesecake Bites combine the rich, classic flavor of red velvet cake with creamy cheesecake in a delightful mini treat. Perfect for parties or a special dessert, they are easy to make and sure to impress your guests.
Ingredients
- 1 cup all-purpose flour
- ¼ cup + 1 tablespoon unsweetened cocoa powder
- ¾ cup salted sweet cream butter (melted and cooled)
- 1¼ cups granulated sugar
- 1 tablespoon red gel food color (Sunny Side Up Bakery brand recommended)
- 2 teaspoons pure vanilla extract
- 2 large eggs (room temperature and beaten)
- 8 ounces cream cheese (softened)
- ¼ cup granulated sugar
- 1 teaspoon pure vanilla extract
- 1 large egg yolk
Instructions
- Step 1: Preheat the oven to 350°F. Spray a mini muffin pan with nonstick cooking spray and set aside.
- Step 2: In a small mixing bowl, whisk together the flour and unsweetened cocoa powder. Set aside.
- Step 3: In a medium bowl, whisk the melted butter, 1¼ cups sugar, red food color, vanilla, and beaten eggs until combined.
- Step 4: Stir in the flour mixture until just incorporated. Avoid overmixing to keep the batter light.
- Step 5: In another medium bowl, beat the cream cheese with a handheld mixer on medium-high speed for 1 minute.
- Step 6: Add ¼ cup sugar and 1 teaspoon vanilla to the cream cheese and beat for 1 to 1½ minutes until smooth.
- Step 7: Add the egg yolk and mix just until fully combined with no yellow streaks remaining.
- Step 8: Transfer the cheesecake mixture to a disposable piping bag or a quart-size ziplock bag.
- Step 9: Place about 1 tablespoon of the red velvet batter into each mini muffin cup.
- Step 10: Snip the tip off the piping or ziplock bag, then pipe about 2 teaspoons of cheesecake filling onto the center of each red velvet base.
- Step 11: Bake for 8 to 9 minutes. Allow the bites to cool in the pan for 20-30 minutes before carefully removing and transferring to a wire rack to cool completely.
Tips & Variations
- For a deeper red color, adjust the amount of red gel food coloring to your preference.
- Make sure the cream cheese is softened well to avoid lumps in the cheesecake filling.
- Use a small cookie scoop to evenly portion the red velvet batter if you prefer not to spoon it in.
- Try adding a pinch of cinnamon or espresso powder to the red velvet batter for a subtle flavor twist.
Storage
Store the cheesecake bites in an airtight container in the refrigerator for up to 3 days. For best texture, allow them to come to room temperature before serving. You can also freeze the bites for up to 1 month; thaw overnight in the refrigerator before enjoying.
How to Serve

Serve this delicious recipe with your favorite sides.
FAQs
Can I use regular food coloring instead of gel food color?
While you can use regular food coloring, gel food colors provide a richer, more vibrant red without thinning the batter, resulting in a better texture and color.
Can these cheesecake bites be made ahead of time?
Yes, you can prepare and bake them a day in advance. Store them in the refrigerator and bring them to room temperature before serving for the best flavor and texture.
PrintRed Velvet Cheesecake Bites Recipe

Delightful Red Velvet Cheesecake Bites featuring a rich red velvet base topped with creamy, smooth cheesecake filling. Perfectly portioned as mini treats, these bites combine classic red velvet flavors with the tangy sweetness of cheesecake, baked to perfection in a mini muffin pan.
- Prep Time: 15 minutes
- Cook Time: 9 minutes
- Total Time: 45 minutes
- Yield: Approximately 24 mini cheesecake bites 1x
- Category: Dessert
- Method: Baking
- Cuisine: American
Ingredients
Red Velvet Base
- 1 cup all-purpose flour
- ¼ cup + 1 tablespoon unsweetened cocoa powder
- ¾ cup salted sweet cream butter (melted and cooled)
- 1¼ cups granulated sugar
- 1 tablespoon red gel food color (Sunny Side Up Bakery brand recommended)
- 2 teaspoons pure vanilla extract
- 2 large eggs (room temperature and beaten)
Cheesecake Filling
- 8 ounces cream cheese (softened)
- ¼ cup granulated sugar
- 1 teaspoon pure vanilla extract
- 1 large egg yolk
Instructions
- Preheat Oven and Prepare Pan: Preheat your oven to 350°F. Spray a mini muffin pan generously with nonstick cooking spray to ensure easy removal of the cheesecake bites later. Set the pan aside.
- Combine Dry Ingredients: In a small mixing bowl, whisk together the all-purpose flour and unsweetened cocoa powder until well combined. Set this dry mix aside for later use.
- Mix Wet Ingredients for Red Velvet Base: In a medium-sized mixing bowl, whisk together the melted and cooled salted sweet cream butter, 1¼ cups granulated sugar, red gel food color, vanilla extract, and beaten eggs until smooth and evenly mixed.
- Incorporate Dry Ingredients: Stir the flour and cocoa powder mixture into the wet ingredients. Mix just until the dry ingredients are fully combined with no visible streaks of flour; avoid overmixing to keep the texture tender.
- Prepare Cheesecake Filling – Beat Cream Cheese: In a separate medium bowl, use a handheld mixer on medium-high speed to beat the softened cream cheese for about 1 minute until creamy and smooth.
- Add Sugar and Vanilla to Cheesecake: Add ¼ cup granulated sugar and 1 teaspoon pure vanilla extract to the cream cheese. Continue mixing for 1 to 1½ minutes until the mixture is well combined and fluffy.
- Add Egg Yolk to Cheesecake Mixture: Mix in the large egg yolk just until the mixture is uniform and no streaks of yolk remain, ensuring a smooth texture.
- Fill the Piping Bag: Transfer the cheesecake filling into a disposable piping bag or a quart-size ziplock bag for easy dispensing.
- Add Red Velvet Batter to Muffin Pan: Spoon about 1 tablespoon of the red velvet batter into each prepared mini muffin cup as the base layer.
- Pipe Cheesecake Filling: Snip off the tip of your piping or ziplock bag and squeeze approximately 2 teaspoons of the cheesecake filling into the center of each red velvet base, creating a layered effect.
- Bake the Cheesecake Bites: Bake in the preheated oven for 8 to 9 minutes until the edges are set but the center remains slightly soft.
- Cool and Remove: Remove the pan from the oven and let the cheesecake bites cool in the pan for 20 to 30 minutes. Then carefully transfer them to a wire rack to cool completely before serving.
Notes
- Do not overmix the batter to keep the red velvet base tender and crumbly.
- Use room temperature eggs and cream cheese for smoother mixing and best texture.
- Allow bites to cool completely before removing from the pan to maintain shape.
- Red gel food coloring provides vibrant color without altering batter consistency.
- Store leftover bites in an airtight container in the refrigerator for up to 3 days.
Keywords: Red Velvet Cheesecake Bites, Mini Cheesecake, Red Velvet Dessert, Cheesecake Recipe, Mini Muffin Desserts


