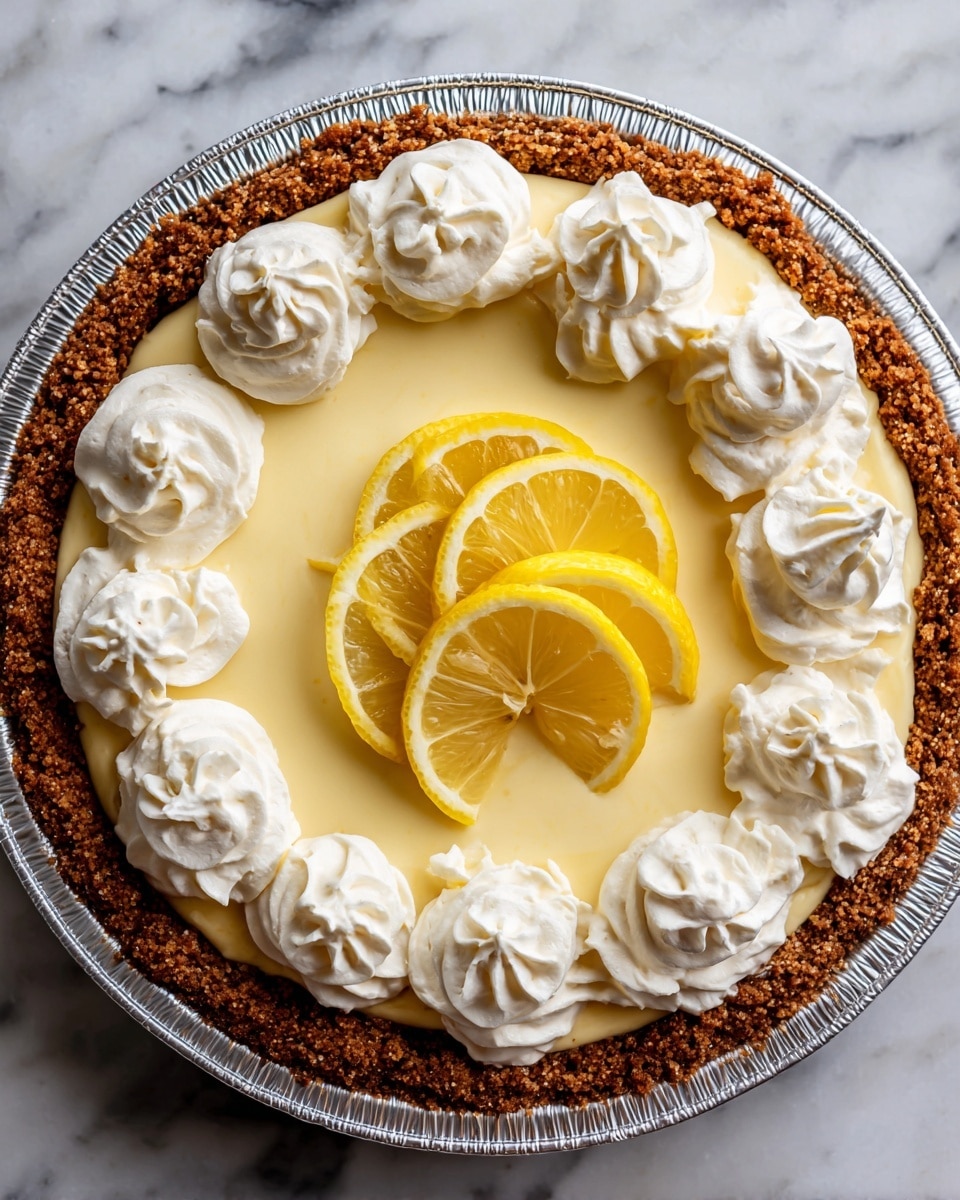
Frozen Lemonade Pie Recipe
Introduction
This Frozen Lemonade Pie is a refreshing and tangy dessert perfect for warm days. With its creamy texture and zesty lemon flavor, it’s an easy no-bake treat that comes together quickly and delights every time.

Ingredients
- 1 Graham Cracker Crust
- 3½ oz Cream Cheese, softened (100g)
- 10½ oz Sweetened Condensed Milk (300g) (¾ of a 14oz can)
- 9 fl oz Frozen Lemonade Concentrate, thawed (255mL)
- ½ cup Heavy Whipping Cream, cold (118mL) (or 1 8oz tub of Cool Whip)
Instructions
- Step 1: In the bowl of a stand mixer, whip the cream cheese until smooth.
- Step 2: Add the sweetened condensed milk and whip until no chunks of cream cheese remain.
- Step 3: With the mixer running, slowly add the frozen lemonade concentrate and mix until smooth.
- Step 4: (Optional) Pass the mixture through a fine mesh sieve into a large mixing bowl for an extra-smooth filling.
- Step 5: In a clean mixing bowl, whip the heavy whipping cream until stiff peaks form.
- Step 6: Very gently fold the whipped cream into the lemonade mixture.
- Step 7: Carefully pour the frozen lemonade pie filling into your prepared graham cracker crust.
- Step 8: Transfer the pie to your freezer and freeze for 6-12 hours.
- Step 9: Decorate, slice, and serve!
Tips & Variations
- For an extra citrus punch, add a teaspoon of lemon zest to the filling before folding in the whipped cream.
- If you prefer a lighter topping, substitute the heavy whipping cream with Cool Whip for a quick alternative.
- Make your own lemonade concentrate by mixing lemon juice, sugar, and water, then freezing it into cubes to thaw as needed.
Storage
Store the Frozen Lemonade Pie in the freezer, tightly covered with plastic wrap or foil. It keeps well for up to one week. To serve, let the pie sit at room temperature for about 10 minutes to soften slightly before slicing.
How to Serve
Serve this delicious recipe with your favorite sides.
FAQs
Can I use a homemade graham cracker crust?
Yes, a homemade graham cracker crust works perfectly. Just make sure it’s fully chilled and firm before adding the filling.
What if I don’t have a stand mixer?
You can use a hand mixer or a sturdy whisk, but be sure to mix thoroughly to avoid lumps in the cream cheese and combine ingredients well.
PrintFrozen Lemonade Pie Recipe

This Frozen Lemonade Pie is a delightfully tangy and creamy dessert perfect for hot days. Made with a graham cracker crust and a luscious filling of cream cheese, sweetened condensed milk, and frozen lemonade concentrate, it’s whipped to smooth perfection and frozen for a refreshing treat.
- Prep Time: 15 minutes
- Cook Time: 0 minutes
- Total Time: 6 hours 15 minutes
- Yield: 1 9-inch pie (approximately 8 servings) 1x
- Category: Dessert
- Method: No-Cook
- Cuisine: American
Ingredients
Crust
- 1 Graham Cracker Crust
Filling
- 3½ oz Cream Cheese, softened (100g)
- 10½ oz Sweetened Condensed Milk (300g) (¾ of a 14oz can)
- 9 fl oz Frozen Lemonade Concentrate, thawed (255mL) (homemade recipe in post)
- ½ cup Heavy Whipping Cream, cold (118mL) (or 1 8oz tub of Cool Whip)
Instructions
- Whip Cream Cheese: In the bowl of a stand mixer, whip the cream cheese until it becomes smooth and creamy, ensuring there are no lumps.
- Add Sweetened Condensed Milk: Add the sweetened condensed milk to the whipped cream cheese and continue whipping until the mixture is uniform and free of any cream cheese chunks.
- Incorporate Lemonade Concentrate: With the mixer running on low, slowly pour in the thawed frozen lemonade concentrate, blending until the mixture is smooth and well combined.
- Optional Straining: For an extra-smooth filling, pass the mixture through a fine mesh sieve into a large mixing bowl, removing any solids or lumps.
- Whip Heavy Cream: In a separate clean bowl, whip the cold heavy whipping cream until stiff peaks form, providing lightness to the filling.
- Fold in Whipped Cream: Gently fold the whipped heavy cream into the lemonade mixture, taking care to keep the mixture light and airy without deflating it.
- Fill Crust: Carefully pour the prepared pie filling into the graham cracker crust, spreading evenly.
- Freeze the Pie: Transfer the pie to the freezer and chill for 6 to 12 hours until fully set and firm.
- Serve: Once frozen, decorate as desired, slice, and serve chilled for a refreshing dessert.
Notes
- Ensure the cream cheese is softened to room temperature for smooth whipping.
- Thaw the frozen lemonade concentrate completely before mixing to avoid lumps.
- If preferred, you can substitute heavy whipping cream with Cool Whip for convenience.
- Allow sufficient freezing time to ensure the pie is fully set before slicing.
- This pie is best served cold directly from the freezer; let it sit a few minutes at room temperature if too firm.
Keywords: Frozen Lemonade Pie, Lemonade dessert, No-bake pie, Frozen pie, Summer dessert, Cream cheese pie, Graham cracker crust

