Creamsicle Fudge Recipe
Introduction
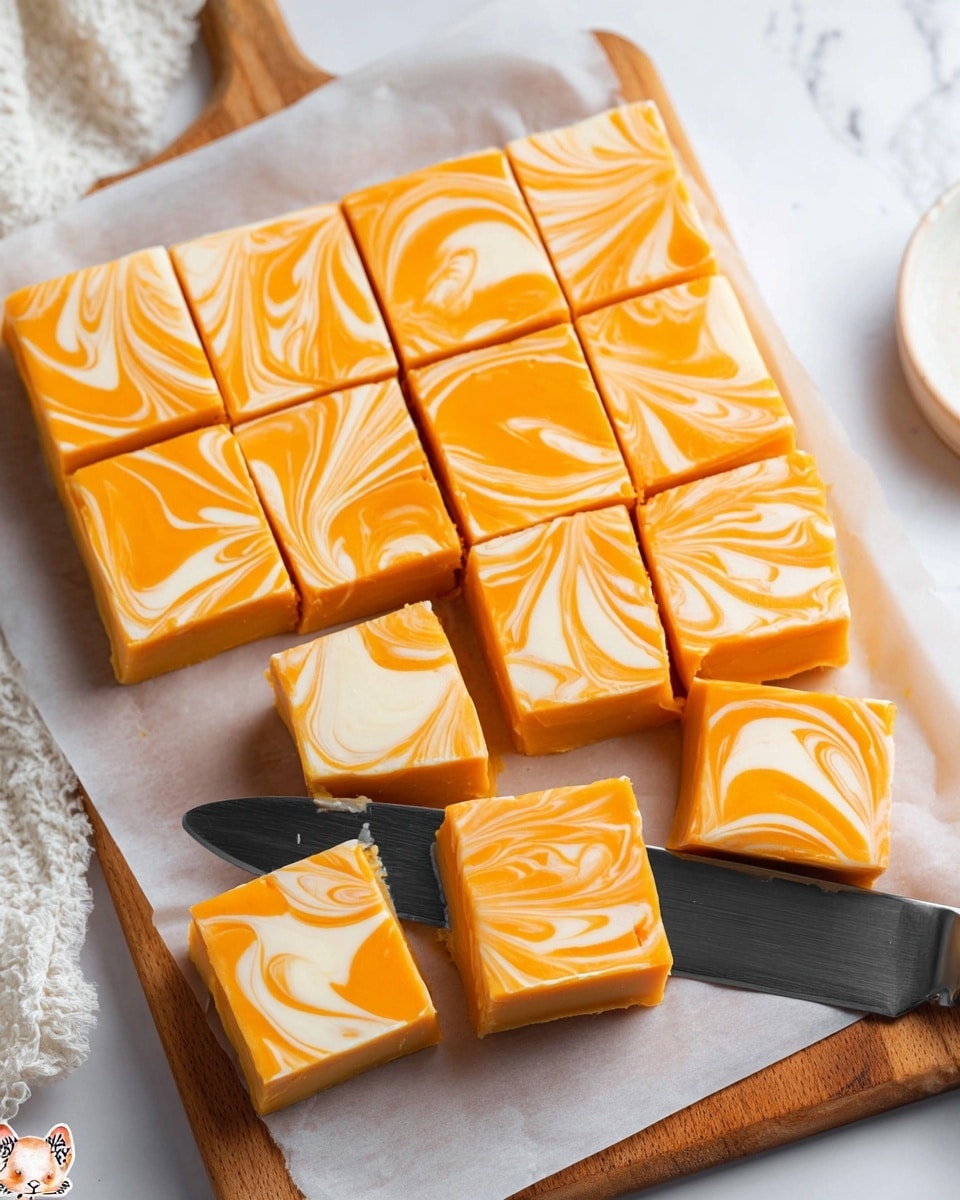
Creamsicle fudge combines creamy white chocolate with bright orange flavors for a sweet and nostalgic treat. This easy no-bake dessert captures the taste of a classic creamsicle in rich, smooth fudge that’s perfect for sharing or gifting.

Ingredients
- 32 ounces white chocolate baking bars (8 bars, 4 ounces each)
- 28 ounces sweetened condensed milk (two 14-ounce cans)
- 8 tablespoons butter (cut into 8 pats)
- 4 teaspoons orange extract
- 6 drops orange gel food coloring (or yellow and red food coloring)
Instructions
- Step 1: Line an 8×8-inch pan with foil and spray it with nonstick spray for easy removal.
- Step 2: In a medium bowl, combine the white chocolate bars, sweetened condensed milk, and butter. Microwave on high for 1 minute, then stir thoroughly. Continue microwaving in 30-second intervals, stirring each time, until the mixture is smooth and creamy.
- Step 3: Stir in the orange extract. Taste and add more if you desire a stronger orange flavor.
- Step 4: Remove 2 cups of the fudge mixture into a separate bowl; this will stay white.
- Step 5: Add the gel food coloring to the remaining fudge and mix until you reach your preferred shade of orange. Use red and yellow gels if needed to achieve the perfect color.
- Step 6: Pour the orange fudge evenly into the prepared pan and smooth the surface.
- Step 7: Spoon the white fudge randomly over the orange layer.
- Step 8: Use a knife or wooden skewer to swirl the two layers together, creating a marbled pattern.
- Step 9: Gently tap the pan on the countertop a few times to release any air bubbles. Pop any large bubbles with a toothpick if necessary.
- Step 10: Refrigerate the fudge uncovered for 4 to 5 hours until it is fully set.
- Step 11: Lift the fudge out of the pan using the foil, peel the foil away, and cut the fudge into squares to serve.
Tips & Variations
- Use high-quality white chocolate for the creamiest texture and best flavor.
- If you prefer a less intense orange taste, start with 2 teaspoons of extract and add gradually.
- Try adding a sprinkle of sea salt on top before setting for a salted creamsicle twist.
- For a fun presentation, drizzle some melted dark chocolate over the top before refrigerating.
Storage
Store creamsicle fudge in an airtight container in the refrigerator for up to 2 weeks. Let it sit at room temperature for a few minutes before serving to soften slightly. You can also freeze the fudge for up to 3 months; thaw in the refrigerator overnight for best results.
How to Serve
Serve this delicious recipe with your favorite sides.
FAQs
Can I use white chocolate chips instead of baking bars?
Yes, white chocolate chips can be used but may require slightly less microwaving time since they tend to melt faster. Stir carefully to avoid overheating.
What if I don’t have orange extract?
You can substitute orange zest combined with a teaspoon of vanilla extract, though the flavor will be milder and less concentrated than with orange extract.
PrintCreamsicle Fudge Recipe

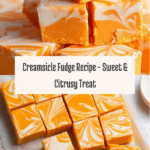
This Creamsicle Fudge is a delightful no-bake treat combining creamy white chocolate with sweetened condensed milk, infused with bright orange extract for a nostalgic creamsicle flavor. The fudge features a beautiful swirled orange and white pattern achieved by mixing orange food coloring into a portion of the fudge before swirling it together, creating a visually stunning and deliciously creamy confection.
- Prep Time: 10 minutes
- Cook Time: 3 minutes (microwaving in intervals)
- Total Time: 4 hours 15 minutes (including chilling time)
- Yield: About 64 squares (depending on size) 1x
- Category: Dessert
- Method: No-Cook
- Cuisine: American
Ingredients
Fudge Base
- 32 ounces white chocolate baking bars (8 bars, 4 ounces each)
- 28 ounces sweetened condensed milk (two 14-ounce cans)
- 8 tablespoons butter (cut into 8 pats)
- 4 teaspoons orange extract
Coloring
- 6 drops orange gel food coloring (or a mixture of yellow and red gel food coloring to achieve orange)
Instructions
- Prepare Pan: Line an 8×8 inch pan with foil and spray it with nonstick cooking spray to ensure easy removal of the fudge after setting.
- Melt Ingredients: In a medium bowl, combine the white chocolate bars, sweetened condensed milk, and butter. Microwave on high for 1 minute, then remove and stir well. Continue microwaving in 30-second intervals, stirring after each, until the mixture is smooth and creamy.
- Add Flavor: Stir in the orange extract and taste the mixture. Add more orange extract if a stronger flavor is desired.
- Separate Mixture: Remove 2 cups of the fudge mixture into a separate bowl; this portion will remain white.
- Color Orange Portion: To the remaining fudge mixture, add the orange gel food coloring. Stir well, adding more drops if needed until you achieve a vibrant orange color.
- Layer Orange Fudge: Pour the orange-colored fudge into the prepared pan and spread it evenly.
- Add White Fudge Swirls: Spoon dollops of the white fudge randomly onto the orange layer.
- Create Swirls: Use a knife or wooden skewer to gently swirl the white fudge into the orange, creating a marbled effect.
- Remove Air Bubbles: Tap the pan firmly on the counter a few times to release any trapped air bubbles. Use a toothpick to pop any large bubbles on the surface.
- Chill: Place the pan in the refrigerator uncovered and chill for 4 to 5 hours or until the fudge is fully set.
- Serve: Once set, lift the fudge out of the pan using the foil edges. Peel back the foil and cut the fudge into squares. Serve and enjoy your creamy, citrusy Creamsicle Fudge!
Notes
- Make sure the fudge mixture is fully smooth before adding the orange extract and coloring to ensure even flavor and color distribution.
- Adjust the orange extract to taste, as some brands are stronger than others.
- Use gel food coloring as it won’t thin out the fudge mixture like liquid coloring might.
- Store fudge in an airtight container in the refrigerator for up to two weeks.
- Allow fudge to come to room temperature slightly before serving for best texture and flavor.
Keywords: creamsicle fudge, white chocolate fudge, no-bake fudge, orange fudge, creamy fudge dessert, homemade fudge
